How To Change Your Cartilage Piercing: A Comprehensive Guide
Changing your cartilage piercing might seem daunting at first, but with the right knowledge and preparation, it can be a straightforward process. Whether you're looking to switch up your style or simply need to replace your jewelry, this guide will walk you through every step. Understanding how to change your cartilage piercing safely is essential to avoid infections or complications.
Cartilage piercings have become increasingly popular in recent years, and for good reason—they offer a unique way to express individuality. However, as with any body modification, proper care and technique are crucial when altering or maintaining your piercing. This article will provide you with detailed instructions, tips, and best practices to ensure your piercing remains healthy and stylish.
Before we dive into the specifics, it’s important to note that cartilage piercings heal differently compared to other types of piercings. Healing times can range from 6 to 12 months, so patience is key. If you're considering changing your cartilage piercing, this guide will help you make informed decisions while prioritizing your health and safety.
Table of Contents
- Understanding Cartilage Piercings
- Tools You Need to Change Your Cartilage Piercing
- Step-by-Step Guide to Changing Your Cartilage Piercing
- Aftercare Tips After Changing Your Cartilage Piercing
- Potential Risks and How to Avoid Them
- Frequently Asked Questions About Cartilage Piercings
- Types of Jewelry for Cartilage Piercings
- Understanding the Cartilage Piercing Healing Process
- When to Seek Professional Help
- Conclusion: Take Charge of Your Piercing Journey
Understanding Cartilage Piercings
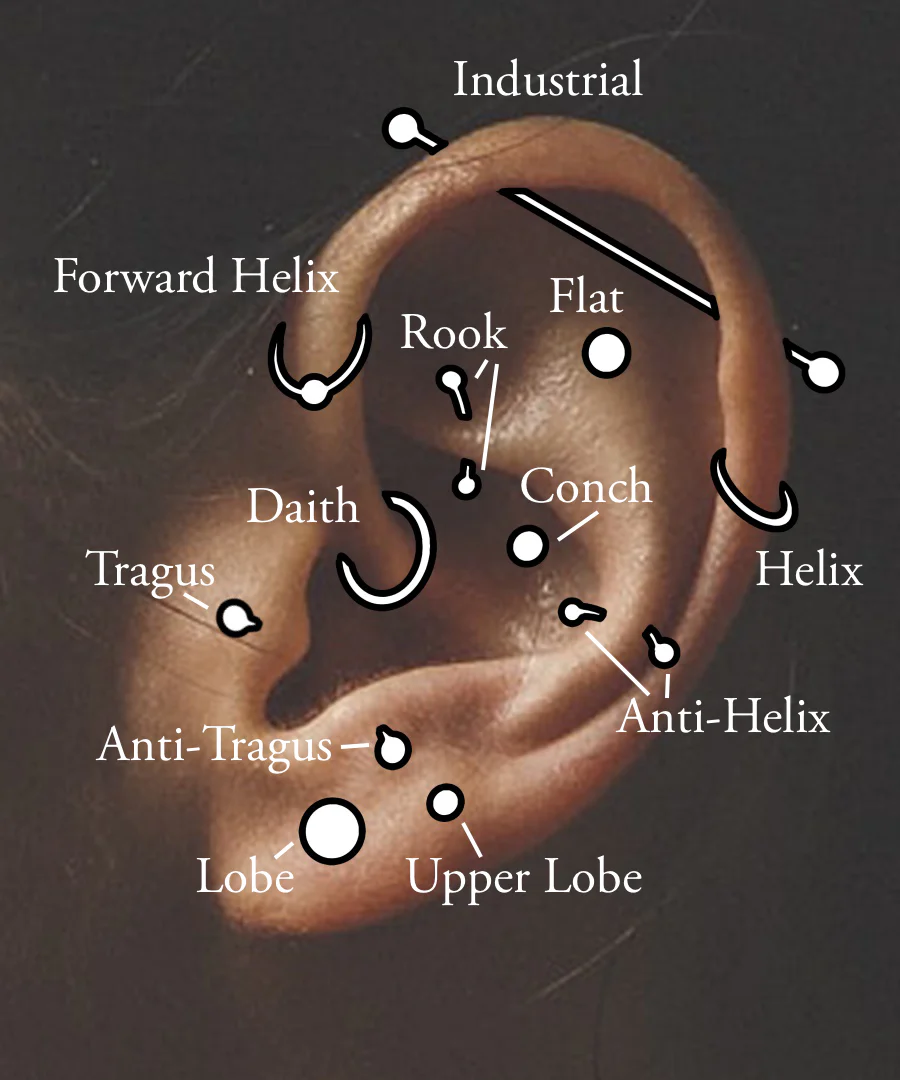
Cartilage piercings involve piercing the upper part of the ear, which includes areas such as the tragus, helix, conch, and daith. Unlike earlobe piercings, cartilage piercings go through thicker tissue, making them more prone to complications if not cared for properly.
One of the most common reasons people want to change their cartilage piercing is to try out new jewelry styles. Whether you're switching from a simple stud to a hoop or upgrading to a more luxurious piece, knowing how to do it safely is vital.
How to change your cartilage piercing involves more than just swapping out jewelry—it requires understanding the healing process and taking precautions to prevent infections.
Tools You Need to Change Your Cartilage Piercing
Before attempting to change your cartilage piercing, gather the necessary tools to ensure a smooth process:
Essential Tools
- Non-latex gloves: Protect your hands and reduce the risk of contamination.
- Alcohol-free cleaning solution: Use a gentle cleanser specifically designed for piercings.
- New jewelry: Ensure your replacement jewelry is clean, sterile, and appropriate for cartilage piercings.
- Tweezers: Use sterilized tweezers to grip the jewelry securely.
Having these tools on hand will make the process easier and safer. Always prioritize hygiene to avoid introducing bacteria to your piercing.
Step-by-Step Guide to Changing Your Cartilage Piercing
Changing your cartilage piercing requires careful attention to detail. Follow these steps to ensure a safe and successful change:
Step 1: Clean Your Hands and Tools
Wash your hands thoroughly with soap and water before handling your piercing. Put on non-latex gloves to maintain cleanliness.
Step 2: Prepare the Area
Gently clean the area around your piercing with an alcohol-free cleaning solution. This will help remove any dirt or bacteria that could cause infection.
Step 3: Remove the Existing Jewelry
Using sterilized tweezers, carefully unscrew or pull out the existing jewelry. Be gentle to avoid irritating the piercing.
Step 4: Insert the New Jewelry
Insert the new jewelry into the piercing hole, ensuring it fits snugly but comfortably. Tighten the backing securely to prevent it from falling out.
Step 5: Clean the Piercing
After inserting the new jewelry, clean the area again to remove any residue or debris. This final step ensures the piercing remains clean and healthy.
Aftercare Tips After Changing Your Cartilage Piercing
Proper aftercare is crucial to maintaining the health of your cartilage piercing. Follow these tips to promote healing and prevent complications:
- Clean the piercing daily with a saline solution or recommended cleanser.
- Avoid touching the piercing unnecessarily to minimize the risk of infection.
- Keep the area dry and avoid swimming or exposing the piercing to dirty water.
- Monitor the piercing for signs of infection, such as redness, swelling, or discharge.
By following these guidelines, you can ensure your cartilage piercing heals properly and remains free of issues.
Potential Risks and How to Avoid Them
While changing your cartilage piercing is generally safe, there are potential risks to be aware of:
- Infection: Always use sterile tools and clean jewelry to reduce the risk of infection.
- Tearing: Be gentle when removing and inserting jewelry to avoid tearing the piercing hole.
- Rejection: Some individuals may experience rejection, where the body pushes the jewelry out. Consult a professional if this occurs.
To minimize risks, consult a professional piercer if you're unsure about the process or encounter any issues.
Frequently Asked Questions About Cartilage Piercings
Q: How long should I wait before changing my cartilage piercing?
A: It's generally recommended to wait at least 6 to 12 months for the piercing to fully heal before changing the jewelry. However, this timeline can vary depending on the individual and the specific piercing.
Q: Can I change my cartilage piercing myself?
A: Yes, you can change your cartilage piercing yourself if you follow proper hygiene and technique. However, if you're unsure or encounter difficulties, it's best to seek professional help.
Q: What type of jewelry is best for cartilage piercings?
A: Surgical steel, titanium, and 14k gold are excellent choices for cartilage piercings due to their hypoallergenic properties.
Types of Jewelry for Cartilage Piercings
When selecting jewelry for your cartilage piercing, consider the following options:
- Captive bead rings: Ideal for initial piercings due to their secure design.
- Barbells: Offer a sleek, minimalist look and are easy to insert.
- Hoops: Provide a stylish and versatile option for those looking to add flair.
Choose jewelry that complements your personal style while ensuring it's safe and comfortable for your piercing.
Understanding the Cartilage Piercing Healing Process
The healing process for cartilage piercings can take several months, during which time it's important to avoid changing the jewelry prematurely. During this period, you may experience mild discomfort, swelling, or tenderness, which are normal signs of healing.
To support the healing process, maintain a consistent aftercare routine and avoid exposing the piercing to harsh chemicals or irritants.
When to Seek Professional Help
If you encounter any of the following issues, consult a professional piercer or healthcare provider:
- Severe pain or swelling that doesn't subside.
- Signs of infection, such as pus, redness, or warmth around the piercing.
- Difficulty inserting or removing jewelry.
Professional guidance can help resolve these issues and ensure your piercing heals properly.
Conclusion: Take Charge of Your Piercing Journey
Changing your cartilage piercing can be a rewarding experience when done correctly. By following the steps outlined in this guide and prioritizing hygiene and aftercare, you can safely alter your jewelry and maintain a healthy piercing.
We encourage you to share this article with others who may find it helpful and leave a comment below if you have any questions or feedback. For more information on body modifications and skincare, explore our other articles on the site.

First Time Taking My Cartilage Piercing Out My experience YouTube
Everything Cartilage Piercings
